Affordable 3D home design software for beginners is revolutionizing home planning! No longer are intricate designs the exclusive domain of professionals. User-friendly software empowers aspiring homeowners to visualize their dream spaces, experiment with layouts, and even refine details before a single brick is laid. This guide dives into the best budget-friendly options, equipping you with the knowledge to navigate the digital design world with confidence.
We’ll explore several software choices, comparing their features, ease of use, and learning curves. From basic layouts to adding furniture and exploring advanced features, we’ll cover everything you need to create a stunning 3D model of your future home. Get ready to unleash your inner architect!
Introduction to Affordable 3D Home Design Software
Designing your dream home can be an exciting but daunting task. Thankfully, affordable 3D home design software makes the process significantly easier and more accessible, allowing you to visualize your ideas before breaking ground. These programs empower you to experiment with different layouts, materials, and styles, saving you time, money, and potential headaches down the line.Benefits of using 3D home design software include the ability to create detailed floor plans, experiment with different design options, visualize the finished product in 3D, share your designs with contractors and family, and potentially reduce construction costs through better planning.
These tools cater to various skill levels, from novice DIYers to seasoned professionals.
Key Features for Beginners in Affordable 3D Home Design Software
Choosing the right software depends on your specific needs and budget. However, several key features are essential for beginners. Intuitive interfaces are crucial for ease of learning and use, while drag-and-drop functionality streamlines the design process. Pre-built templates and a wide selection of materials offer a head start, and 3D rendering capabilities allow you to see your design come to life.
Finally, the ability to easily export your designs in various formats (like PDFs or images) is vital for sharing your plans with others.
Free vs. Paid 3D Home Design Software
Free software options often offer limited features and functionality, frequently displaying watermarks on exported images or limiting the number of projects you can save. Paid software, conversely, typically provides more extensive features, higher-quality rendering, and professional-grade tools. The choice depends on your needs and budget. If you’re experimenting or only need a simple design, free software might suffice. However, for detailed plans and high-quality visuals, a paid subscription is often worth the investment.
Consider the extent of your project before deciding.
Comparison of Affordable 3D Home Design Software Options
The following table compares three popular and affordable options, highlighting their pricing, key features, and user-friendliness. Remember that pricing and features can change, so always check the software provider’s website for the most up-to-date information.
| Software | Pricing | Key Features | Ease of Use |
|---|---|---|---|
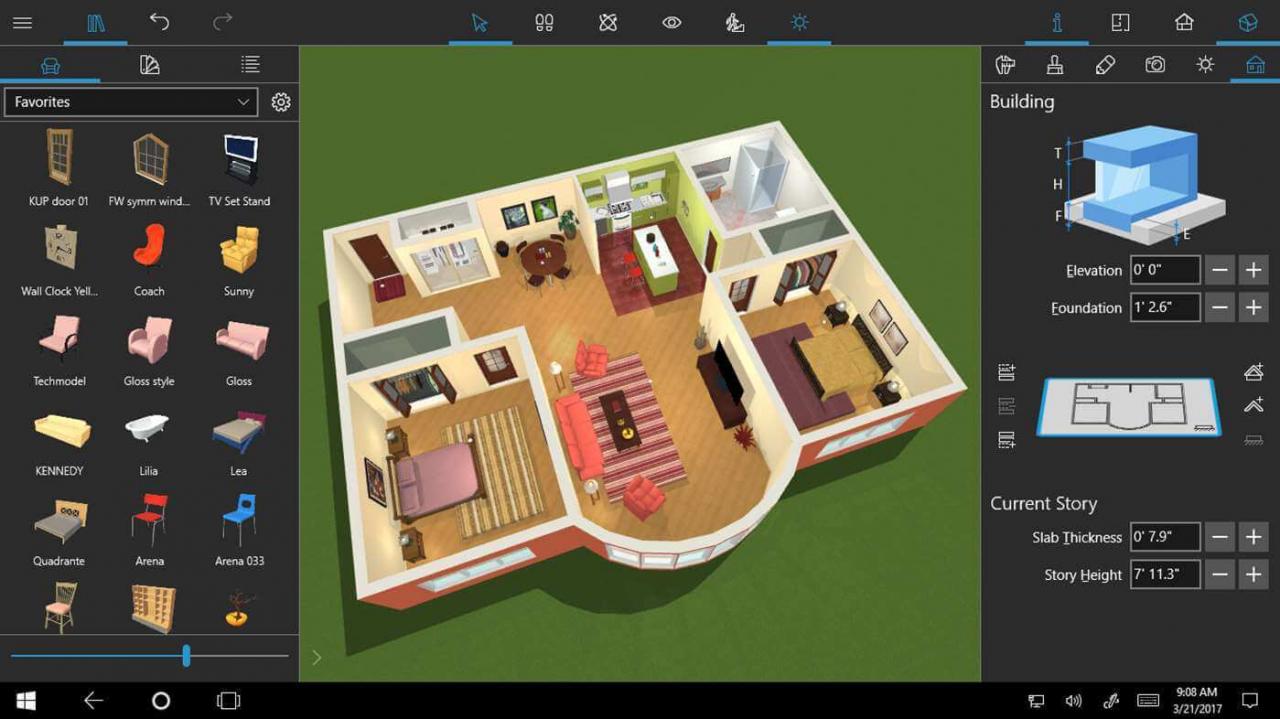
| Planner 5D | Free version with in-app purchases; paid subscription for full features | Intuitive interface, drag-and-drop functionality, extensive material library, 3D and 2D views, furniture catalog, room planning tools | Very easy; suitable for beginners |
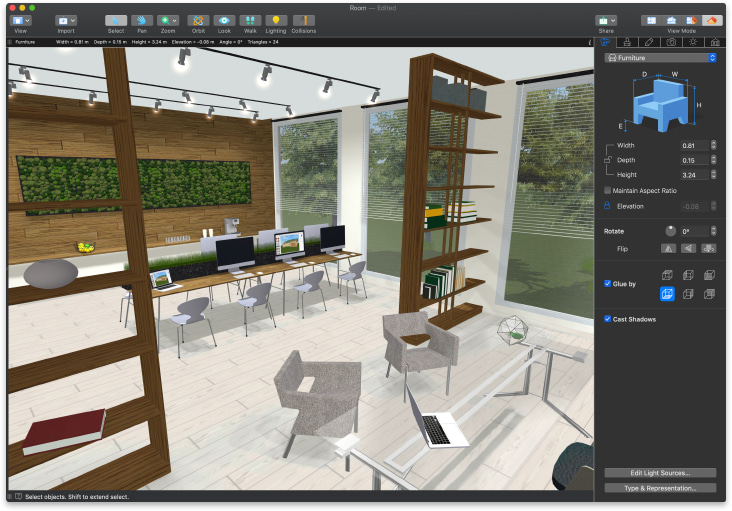
| SketchUp Free | Free web-based version; paid desktop version available | Basic 3D modeling capabilities, large community support, extensive plugin ecosystem (paid and free), 3D rendering | Moderate; steeper learning curve than Planner 5D |
| Sweet Home 3D | Free and open-source | Simple interface, 2D and 3D views, furniture catalog, easy export options | Easy; good for basic designs |
Software Options for Beginners
Choosing the right 3D home design software can feel overwhelming, especially for beginners. Fortunately, several user-friendly and affordable options exist, making the process of designing your dream home accessible to everyone. This section will explore three popular choices, highlighting their strengths and weaknesses to help you make an informed decision.
User-Friendly Software Options
Three excellent choices for beginners include Sweet Home 3D, SketchUp Free, and Planner 5D. These programs offer intuitive interfaces and a wealth of resources to guide you through the design process, regardless of your prior experience with 3D modeling.
Unlocking your dream home just got easier! Affordable 3D home design software for beginners empowers you to visualize stunning spaces, and if you’re into sleek aesthetics, check out this inspiration for a classic modern home design with open floor plan before you start designing. These programs make experimenting with layouts, like open floor plans, a breeze, allowing you to perfect your design before even picking up a hammer.
So, grab that software and start creating!
Sweet Home 3D: A Simple and Effective Approach
Sweet Home 3D stands out for its incredibly straightforward interface. The software employs a drag-and-drop system, allowing users to easily place walls, furniture, and other elements within the design. Its 2D plan view simplifies the initial layout process, while the 3D rendering provides a realistic preview of the finished product. The learning curve is exceptionally gentle; even individuals with minimal computer experience can quickly grasp the basics.
Numerous online tutorials and a supportive community forum are readily available for assistance.
- Pros: Extremely user-friendly interface, free to use, large library of pre-made objects, excellent for basic home design.
- Cons: Limited advanced features, rendering quality might not be as high as professional software, fewer customization options for objects.
SketchUp Free: A Balanced Blend of Simplicity and Functionality
SketchUp Free offers a more comprehensive feature set than Sweet Home 3D while maintaining a relatively accessible interface. While it incorporates more advanced tools, the software’s intuitive design allows beginners to gradually explore its capabilities. The software’s strength lies in its ability to seamlessly transition between 2D and 3D views, facilitating a smooth design workflow. Extensive online tutorials, including video guides and written documentation, are available, alongside a vibrant user community providing support and inspiration.
- Pros: Good balance of simplicity and functionality, free to use (with limitations), large online community, excellent for learning 3D modeling basics.
- Cons: Some features are limited in the free version, the interface can feel slightly more complex than Sweet Home 3D for absolute beginners, requires some time investment to master advanced features.
Planner 5D: A Visually Appealing and Comprehensive Option
Planner 5D boasts a visually appealing interface and a broad range of features, making it a strong contender for both beginners and more experienced users. Its drag-and-drop functionality and intuitive controls make it relatively easy to learn, even without prior experience. The software provides a variety of tools for creating detailed and realistic home designs, including the ability to add textures and customize objects extensively.
While it has a steeper learning curve than Sweet Home 3D, Planner 5D offers a wealth of tutorials, both within the application and online, making it accessible to a wide audience.
- Pros: Visually appealing interface, extensive features, large object library, easy to share designs.
- Cons: Free version has limitations, some features can be complex for absolute beginners, requires a more significant time investment to master all features.
Essential Features for Beginners
Choosing the right 3D home design software can feel overwhelming, especially for beginners. However, focusing on a few key features can significantly simplify the learning curve and empower you to create impressive designs. This section highlights five essential features crucial for novices, explaining their importance and illustrating their use with a simple example project in a popular, affordable software.
Intuitive Interface and User-Friendliness
A beginner-friendly software prioritizes ease of navigation and understanding. Complex interfaces can be daunting, leading to frustration and abandonment. An intuitive design, with clearly labeled tools and menus, allows users to quickly grasp the basics and start creating. For example, SketchUp’s interface is widely praised for its simplicity and ease of use, making it ideal for beginners.
The tools are logically organized, and the workspace is uncluttered, allowing users to focus on the design process rather than navigating a complicated system. Imagine trying to create a simple rectangular room: in SketchUp, you simply select the “rectangle” tool, click and drag to define the dimensions, and the software automatically creates the walls. No complex commands or menus are needed.
3D Modeling Tools, Affordable 3d home design software for beginners
The ability to create and manipulate 3D models is the core function of any home design software. Beginners need tools that allow them to easily build walls, roofs, and other structural elements. The software should offer a variety of shapes and tools to create accurate representations of the house. In SketchUp, for instance, the “push/pull” tool is incredibly powerful and intuitive.
You can create a basic shape like a cube, and then use the “push/pull” tool to extrude or inset faces, creating walls, windows, and other architectural details with ease. To create a simple window, you would first draw a square on a wall, then use the “push/pull” tool to create depth, essentially carving out the window opening.
Material and Texture Application
Visualizing a design is crucial, and applying materials and textures adds realism and allows for better design decisions. The software should provide a library of common materials (wood, brick, tile, etc.) with realistic textures, allowing users to see how different materials will look in the finished product. SketchUp offers a wide range of materials that can be easily applied to surfaces.
You simply select the surface you want to change and then choose the material from the library. For example, you could apply a wood texture to the floor, brick to the exterior walls, and tile to the bathroom. This immediately transforms a basic 3D model into a much more visually appealing and realistic representation.
Basic Measurement and Dimensioning Tools
Accuracy is paramount in home design. Beginners need tools to easily measure and dimension their designs to ensure they meet specific requirements. The software should allow for precise measurements of walls, rooms, and other elements, helping users create designs that are both functional and aesthetically pleasing. SketchUp provides tools to measure distances, areas, and volumes. For example, after drawing a room, you can use the “tape measure” tool to verify its dimensions match your planned measurements.
This helps prevent design errors early in the process.
Easy Rendering Capabilities
Rendering allows users to create photorealistic images of their designs. While advanced rendering techniques can be complex, beginners need access to basic rendering capabilities to visualize their designs in a more realistic context. SketchUp offers simple rendering options that allow users to quickly generate images of their designs. This feature helps beginners visualize the final product and make informed design choices.
A simple rendering can show how the chosen materials and lighting will affect the overall look of the space.
Unlocking your dream home starts with affordable 3D home design software perfect for beginners! These tools empower you to experiment with various styles, including the sleek and sophisticated look of a classic modern home design with a minimalist aesthetic , before committing to any real-world changes. Mastering these programs is easier than you think, paving the way for creating stunning, personalized spaces on a budget.
| Feature | Importance | Example (SketchUp) |
|---|---|---|
| Intuitive Interface | Easy navigation and understanding for beginners. | Selecting the “rectangle” tool to draw a room. |
| 3D Modeling Tools | Creating and manipulating 3D models of walls, roofs, etc. | Using “push/pull” to create windows and doors. |
| Material & Texture Application | Adding realism and visualizing material choices. | Applying wood texture to floors and brick to walls. |
| Measurement & Dimensioning | Ensuring accuracy and meeting specific requirements. | Using the “tape measure” tool to verify room dimensions. |
| Basic Rendering | Visualizing the design in a realistic context. | Generating a simple rendering to see material and lighting effects. |
Designing a Basic Home Layout

Designing your dream home in 3D software can feel daunting, but with a step-by-step approach, even a basic layout becomes achievable. This section guides you through the process using a hypothetical, user-friendly software called “HomeDesignPro” (replace with your chosen software if different). Remember, the specific tools and menus may vary slightly depending on your chosen software.
The key to success lies in planning. Before you even open the software, sketch a rough floor plan on paper. This helps visualize the space and identify potential issues early on. Consider room sizes, traffic flow, and the placement of windows and doors for optimal sunlight and ventilation. This pre-planning significantly streamlines the digital design process.
Creating Walls, Doors, and Windows
Once you’ve launched HomeDesignPro, you’ll typically find tools for creating walls, doors, and windows in a dedicated toolbar. Begin by drawing the exterior walls of your house. Most software allows you to input dimensions directly, ensuring accuracy. For example, you might create a 20ft x 30ft rectangle for the main living area. Then, add interior walls to define individual rooms – bedrooms, bathrooms, kitchen, etc.
Ensure walls meet at right angles for a clean and realistic look. Use the “snap-to-grid” feature (if available) to maintain straight lines and accurate measurements.
Next, add doors and windows. Select the door or window tool and click on the wall where you want to place it. You can usually adjust the size and type of door or window, choosing from various styles and materials offered by the software. HomeDesignPro might offer pre-set sizes, or you can manually enter custom dimensions. Pay attention to building codes and regulations regarding window and door placement for safety and efficiency.
For instance, a bedroom should ideally have at least one window for ventilation and emergency exit.
Adding Basic Furniture and Fixtures
After defining the structure, it’s time to furnish your space. HomeDesignPro, like most 3D design software, provides a library of pre-made furniture and fixtures. You can browse through categories such as sofas, beds, tables, kitchen cabinets, and bathroom sinks. Simply drag and drop the desired items into your rooms. Adjust their size, position, and rotation to fit the space and create a realistic layout.
Remember to consider the scale of the furniture relative to the room size to avoid any disproportionate appearance. For example, a king-size bed will occupy significantly more space than a twin bed.
Experiment with different arrangements until you achieve a layout that satisfies your needs and aesthetic preferences. Consider traffic flow – ensure there’s enough space to move comfortably between furniture pieces. You can also use the software’s measurement tools to verify clearances between furniture and walls, preventing cramped spaces.
Exploring Advanced Features (Optional): Affordable 3d Home Design Software For Beginners
While beginner-friendly 3D home design software often focuses on ease of use, many offer advanced features that can significantly elevate your designs. These tools, while not strictly necessary for basic projects, can add professional polish and allow for more complex and personalized creations. Mastering even a couple of these features can make a big difference in the quality and detail of your final renders.Exploring these advanced features helps users transition from basic home layouts to more intricate and realistic designs.
Understanding features like advanced rendering options and material customization can drastically improve the visual appeal of your projects and provide a more accurate representation of your vision. This section will delve into two such features, showcasing their application and impact.
Advanced Rendering Options
High-quality renderings are crucial for visualizing your design’s final look. Many affordable software options include advanced rendering settings that go beyond basic visualization. These settings allow you to control lighting, shadows, and reflections, resulting in photorealistic images. This is particularly helpful for presenting your designs to clients or contractors, as high-quality renders can significantly improve communication and understanding.Let’s consider two key aspects: global illumination and ambient occlusion.
Global illumination simulates how light bounces around a scene, creating more realistic lighting and shadows. Imagine a sunlit room: light doesn’t just hit the walls directly; it also bounces off surfaces, creating softer shadows and more nuanced lighting effects. Global illumination captures this effect, creating a more immersive and lifelike rendering. A screenshot of a rendered kitchen would show how global illumination softens harsh shadows cast by cabinets and illuminates darker corners more realistically, compared to a basic render without this feature.
The difference would be noticeable in the subtle gradations of light and shadow across the scene. The screenshot description would highlight how the shadows are softer and more diffused, creating a more realistic and less artificial appearance.Ambient occlusion, on the other hand, simulates the way light is blocked in crevices and corners. This creates subtle shading that adds depth and realism to the model.
For example, a screenshot of a rendered fireplace would show how ambient occlusion creates subtle shading around the edges of the bricks, making them appear more three-dimensional and textured. The description would emphasize how the shadows subtly define the individual bricks and crevices, adding visual richness and realism compared to a flat, untextured appearance.
Material Customization
Beyond basic wall and floor colors, many software packages allow for extensive material customization. This goes beyond simply choosing a color; it allows you to select materials with specific textures and properties. This significantly enhances the realism of your renders and lets you experiment with different materials to achieve your desired aesthetic.This is especially useful for beginners who may be uncertain about material choices in a real-world construction setting.
Experimenting with various textures and finishes within the software allows them to explore different options and visualize their impact before making any real-world decisions. For instance, one can compare the visual difference between a glossy kitchen countertop and a matte one. A screenshot showing a kitchen with both types of countertops would illustrate this point effectively. The description would note the distinct visual impact: the glossy countertop reflects light more intensely, creating a brighter, more modern look, while the matte countertop provides a more subdued, sophisticated feel.
Another screenshot could showcase different wood textures for flooring, allowing the user to compare the visual effect of oak versus walnut, for example. The description would highlight the distinct grain patterns and color variations, helping the user visualize the impact of each choice.
Workflow for Advanced Features
The following flowchart illustrates a typical workflow when using advanced rendering and material customization features:[Flowchart description: The flowchart would begin with “Start,” followed by a box indicating “Choose desired advanced features (e.g., Global Illumination, Ambient Occlusion, Material Customization).” This would branch into separate paths for each feature. Each path would involve steps such as “Select feature settings,” “Adjust parameters,” and “Render the scene.” All paths would converge at a final box labeled “Review and refine the rendering,” which then leads to “End.”]
Tips and Tricks for Beginners
Mastering affordable 3D home design software doesn’t require years of architectural training. With a few smart strategies, even complete novices can create impressive designs efficiently. This section dives into practical tips and tricks to boost your design skills and avoid common pitfalls. Remember, the key is to experiment, learn from your mistakes, and have fun!Many beginners find the transition to 3D modeling a bit daunting.
However, by focusing on a few key techniques and understanding common errors, you can significantly improve both the speed and quality of your designs. The tips below offer a roadmap to navigate the software effectively and confidently create your dream home.
Common Beginner Mistakes and How to Avoid Them
Understanding common mistakes is crucial for efficient learning. Avoiding these pitfalls saves time and frustration, leading to a smoother design process.
- Ignoring the Scale: Beginners often neglect accurate scaling, leading to disproportionate rooms and unrealistic designs. Solution: Always start by defining your project’s scale precisely and consistently use the software’s measurement tools. Regularly check your dimensions against your initial plans.
- Overlooking Details: Focusing solely on the big picture can result in overlooking crucial details like window placement, door swings, and electrical outlets. Solution: Work methodically, starting with the basic layout and gradually adding details. Use layers to organize your work and easily access specific elements.
- Neglecting Material Selection: Choosing materials haphazardly can significantly impact the visual appeal and realism of your design. Solution: Explore the software’s material library and consider how different materials affect the overall aesthetic. Experiment with textures and colors to achieve the desired look.
- Rushing the Process: Trying to complete the design too quickly often leads to errors and a less refined final product. Solution: Take your time, break the project into smaller, manageable tasks, and review your work regularly. Don’t be afraid to start over if necessary.
- Not Utilizing Tutorials and Help Resources: Many beginners struggle because they don’t leverage the wealth of online resources available. Solution: Explore the software’s tutorials, online forums, and user communities. These resources provide invaluable guidance and troubleshooting tips.
Examples of Successful Beginner Projects
Seeing successful projects can be highly motivating. These examples highlight how beginners can achieve impressive results with careful planning and effective use of the software.Imagine a beginner designing a small cottage. Their success stemmed from starting with a simple rectangular footprint, meticulously planning the placement of windows to maximize natural light, and carefully selecting materials that reflected the rustic charm of a cottage.
The final render, though simple, showcased a cohesive and appealing design, demonstrating that effective design doesn’t require excessive complexity. Another example could be a student creating a modern apartment layout. By utilizing the software’s built-in tools to create clean lines and incorporating realistic textures and lighting, they created a visually stunning and functional space. The key to both projects was a focus on functionality, careful planning, and a keen eye for detail.
Five Helpful Tips to Improve Efficiency and Design Quality
These five tips can significantly enhance your design process. By incorporating these strategies, you’ll produce higher-quality designs more efficiently.
- Start Simple: Begin with a basic layout before adding intricate details. This helps you establish a strong foundation and avoid getting overwhelmed.
- Use Layers: Organize your design using layers. This allows you to easily edit and manage individual elements without affecting the rest of your project.
- Master the Tools: Familiarize yourself with the software’s essential tools before tackling complex features. Practice using each tool to understand its capabilities.
- Utilize Templates: Many software packages offer templates. These provide a starting point and can save significant time.
- Seek Feedback: Share your work with others and seek constructive criticism. This helps identify areas for improvement and gain fresh perspectives.